
Outdoor Shower Ideas: How to Install an Outdoor Shower at Home
Installing an outdoor shower can elevate your backyard experience. Start by choosing a convenient location near your home's water supply and back door. Consider sun exposure, drainage, and local building codes. You'll need durable, corrosion-resistant components like a shower valve, showerhead, and supply lines. For a simple setup, attach a rinse station to an existing outdoor faucet. For a more luxurious experience, install a fully equipped enclosure with hot and cold water options. Don't forget to plan for proper drainage and privacy. Regular maintenance and winterization will keep your outdoor shower functioning for years. Dive in to discover how to create your perfect backyard oasis.
Key Takeaways
- Choose a location near existing plumbing and with proper drainage for easier installation and functionality.
- Install durable, corrosion-resistant components like shower valves, heads, and supply lines for longevity.
- Comply with local building codes for setback requirements, restrictions, and gray water disposal.
- Consider adding features like built-in seating, storage niches, and low-voltage lighting for enhanced comfort.
- Implement proper winterization techniques, including draining pipes and removing showerheads, to prevent freeze damage.
Benefits of Outdoor Showers
Outdoor showers offer a multitude of benefits that can enhance your home and lifestyle. You'll find they provide easy access to rinse off sand, chlorine, or dirt before entering your house, keeping your indoor spaces cleaner. For gardeners, an outdoor shower offers a dedicated space to wash up after tending to plants, eliminating the need to track soil indoors.
If you're an active family or athlete, you'll appreciate the convenience of cleaning off after outdoor activities. Your outdoor shower can include hot and cold water options, allowing for comfortable use in various weather conditions. Imagine the invigorating experience of a cold shower on a hot summer day or a steamy rinse on a crisp autumn evening.
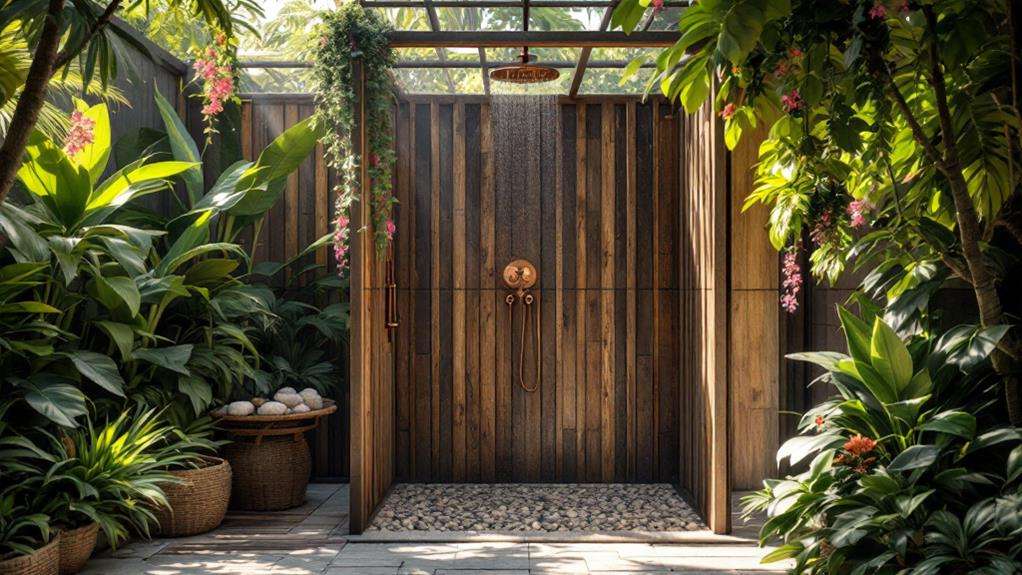
For those seeking a touch of luxury, an outdoor shower can provide a spa-like experience right in your backyard. You'll enjoy the refreshing sensation of water cascading over you while surrounded by nature. Whether you opt for a DIY project or professional installation, an outdoor shower is a versatile addition to your home. It's not just practical; it's an opportunity to elevate your daily routine and make the most of your outdoor space.
Choosing the Perfect Location
Now that you're aware of the benefits, let's focus on selecting the ideal spot for your outdoor shower. Consider proximity to your home's water supply and back door for convenience. The side of the house often provides a natural privacy barrier and easy access to plumbing.
Ensure proper air circulation to prevent mold and mildew growth. Choose a location with good drainage to avoid standing water on the shower floor. If you're opting for a freestanding outdoor shower, select a level area that can support the structure and provide stability.
Think about sun exposure and shade. A partially shaded spot can offer comfort during hot days while allowing some sunlight for natural warmth. Consider the view from your shower area, both for your enjoyment and to maintain privacy from neighbors.
Evaluate the water flow and pressure at your chosen location. Test it before finalizing your decision to ensure a satisfactory shower experience. Lastly, check local building codes and regulations to ensure compliance with setback requirements and other restrictions that may affect your outdoor shower's placement.
Types of Outdoor Showers
Typically, outdoor showers come in three main types: simple rinse stations, fully equipped enclosures, and custom-built designs. Each type offers different features and installation complexity, catering to various needs and budgets.
Simple rinse stations are the most basic and affordable option. You'll find them easy to install, as they're often attached to an existing outdoor faucet or spigot. While they only provide cold water, they're perfect for a quick rinse after a swim or gardening session.
Fully equipped shower enclosures offer a more luxurious bathing experience. These include:
- Hot and cold water options
- Privacy enclosures
- Changing areas
Custom-built designs are the most complex but allow for seamless integration with your home's architecture and landscape design. You can tailor these showers to complement your outdoor space perfectly.
When choosing an outdoor shower type, consider your desired features, budget, and installation complexity. Simple rinse stations are ideal if you're looking for a quick and easy solution. However, if you want a complete bathing experience that enhances your outdoor living space, fully equipped enclosures or custom-built designs might be more suitable. Remember, your choice should align with your specific needs and the overall aesthetic of your home and landscape.
Essential Components and Materials
Once you've decided on the type of outdoor shower that suits your needs, it's time to focus on the key components and materials that will bring your vision to life. Your outdoor shower kit should include everything you need: a shower valve, shower head, supply lines, and necessary adapters to connect to your existing hot and cold water source.
When selecting materials, opt for durable, corrosion-resistant options like brass and stainless steel for your shower fixtures. These will withstand the elements and prevent mold growth. Choose an adjustable, all-metal shower head for versatility and longevity.
Install the shower valve and trim between 38-48 inches from the shower floor, with the shower head at about 80 inches. This ensures comfortable use for most people. Consider adding hot water capability for future expansion, even if you're not planning to use it immediately.
Customize your setup to fit your specific space and needs. Think about the shower's primary function, usage patterns, and proximity to your house. Don't forget to use environmentally friendly, biodegradable soaps to protect your outdoor space. With these essential components and materials, you'll create a functional and enjoyable outdoor shower experience.
Installation Process
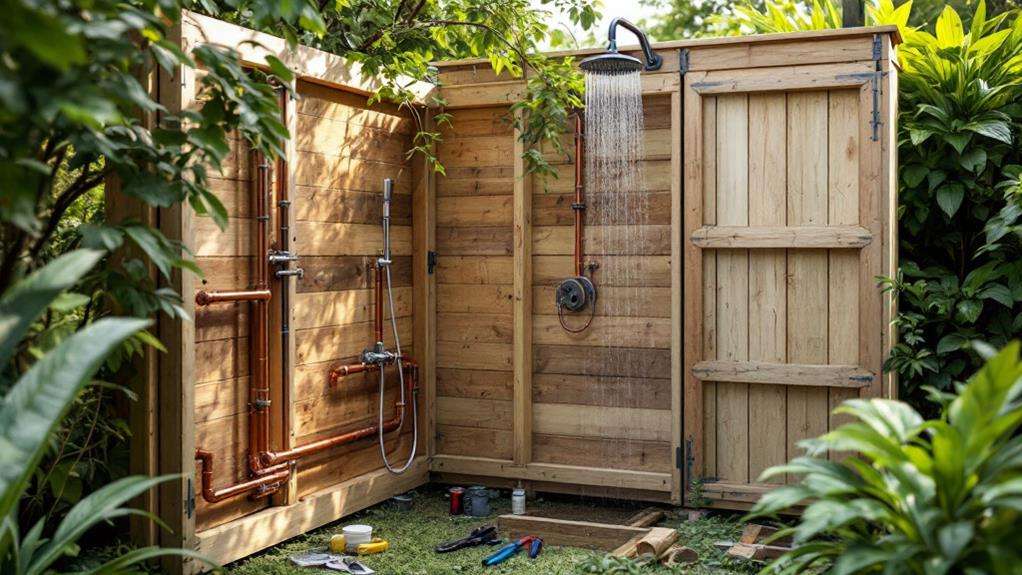
The installation process for your outdoor shower is a crucial step that requires careful planning and execution. To successfully build an outdoor shower, you'll need to focus on simple plumbing, proper drainage, and weatherproofing. Start by choosing a location near existing plumbing to simplify the installation and reduce costs. Next, ensure you're following local building codes for gray water disposal, which may involve constructing a dry well or connecting to the sewer system.
When installing an outdoor shower, consider these key steps:
- Connect the plumbing system, including a pressure-balance valve and exposed riser
- Install weather-resistant shower heads and a removable showerhead for winter storage
- Create proper drainage and construct changing areas if desired
As you Install an Outdoor shower, focus on using durable materials that can withstand the elements in your outside space. Proper ventilation is essential to prevent mold and mildew growth in your outdoor setting. By carefully considering these aspects of the Installation Process, you'll create a functional and long-lasting outdoor shower that enhances your outdoor living experience and provides a refreshing oasis in your backyard.
Enhancing Your Shower Experience
While your outdoor shower's basic functionality is essential, enhancing your shower experience can transform it into a luxurious retreat. Consider incorporating built-in seating, heated towel racks, and low-voltage lighting to elevate your DIY outdoor shower. Add outdoor speakers for a spa-like atmosphere and storage niches for convenience.
To make your outdoor shower eco-friendly, install a gray water recycling system and low-flow showerheads. Use natural, biodegradable soaps and consider a solar-powered water heater for hot water. If you're feeling adventurous, a composting toilet can further reduce your environmental impact.
When planning your shower, think about privacy, wind protection, and sun exposure. Proper siting ensures comfort and efficiency, especially if you're using solar heating. Don't forget about drainage and how your shower will integrate with your garden hose setup and overall landscape.
To maximize your investment, develop a maintenance plan. Regularly clean and inspect your outdoor shower, and don't forget to winterize it. Whether you opt for a simple DIY shower or a luxurious rain shower, proper care will ensure your outdoor oasis remains a good idea for years to come.
Maintenance and Winterization Tips
To keep your outdoor shower in top condition, you'll need to establish a regular maintenance routine and prepare for winter. Whether you've got a shower on the side of your house or a standalone unit, regular cleaning and disinfecting will prevent mold and mildew buildup. Don't forget to inspect and replace worn parts like washers or showerheads to maintain proper function.
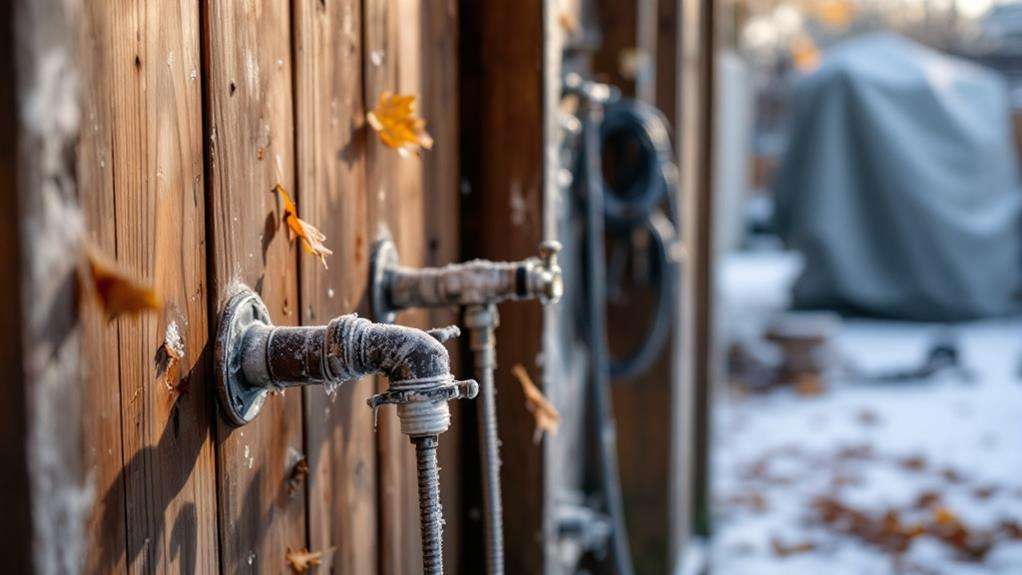
When winter approaches, it's crucial to winterize the outdoor shower to protect it from freezing temperatures. Here's what you should do:
- Turn off the water supply and drain the pipes
- Remove the showerhead and store it indoors
- Cover the unit with a weatherproof cover
To make winterization easier and prevent freeze damage, consider installing a frost-proof faucet or a drain valve. These additions can increase the value of your outdoor shower and make it feel more luxurious.
Depending on your needs, you might choose to schedule an annual inspection with a professional plumber. This can help ensure your outdoor shower remains in top shape, whether you use it to rinse off muddy feet or decide to add a rain-style showerhead attached to an overhead beam. Regular maintenance will keep your outdoor shower functioning properly for years to come.