
How to Replace Your Toilet Seat in 5 Easy Steps
To replace your toilet seat in 5 easy steps, start by gathering the necessary tools and materials. Next, remove the old seat by unscrewing the bolts and lifting it off. Take this opportunity to thoroughly clean the toilet bowl, ensuring a hygienic surface for the new seat. Then, install the new seat by aligning it with the bolt holes and securing it firmly. Finally, test and adjust the new seat to ensure proper fit and functionality. With these simple steps, you'll have a fresh, comfortable toilet seat in no time. For a more detailed guide on each step, continue on to learn expert tips and tricks.
Key Takeaways
- Gather necessary tools: socket wrench, screwdriver, and new toilet seat with bolt kit.
- Remove the old seat by unscrewing bolts and lifting it off the toilet bowl.
- Clean the toilet bowl thoroughly using a disinfectant cleaner and toilet brush.
- Position the new seat, insert bolts, and secure with nuts using an adjustable wrench.
- Test the new seat for proper fit, level, and alignment, making adjustments as needed.
Gather Tools and Materials
The first step in replacing your toilet seat is gathering all the necessary tools and materials. You'll need a socket wrench, an adjustable wrench, and a small screwdriver to remove the old toilet seat hinge and install the new one. Don't forget to have a new toilet seat with the appropriate bolt kit ready.
To protect yourself and ensure cleanliness, wear nitrile gloves throughout the process. It's also wise to have penetrating oil on hand in case you encounter stuck or corroded bolts. Grab a towel to protect the surrounding area during the installation.
Before you begin, thoroughly clean the toilet seat and rim while wearing your gloves. This step is crucial for hygiene and will make the installation process smoother. Once you've gathered everything, double-check that all tools and materials are within easy reach.
Ensure you have the correct size socket wrench for the bolts on your specific toilet seat hinge. If you're unsure, measure the bolt size before purchasing tools. With everything prepared, you're ready to tackle the next steps in replacing your toilet seat efficiently and effectively.
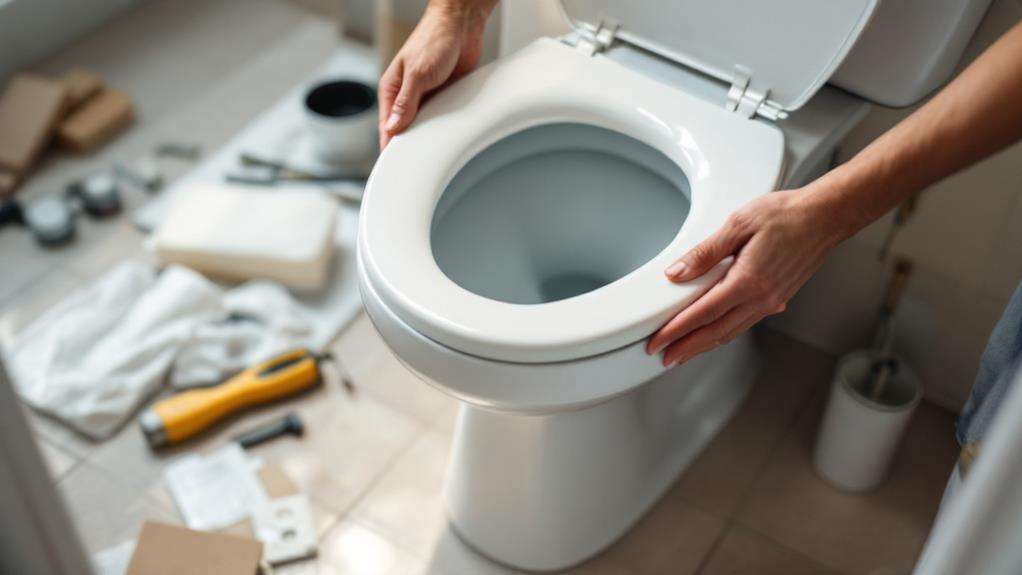
Remove the Old Toilet Seat
With your tools and materials ready, it's time to remove the old toilet seat. Most toilet seats are attached with two bolts at the back of the bowl. Locate these bolts and examine how they're secured. You'll likely find plastic caps covering the nuts; pry these off gently with a flathead screwdriver.
Once exposed, start unscrewing the bolts. If they're metal, they may be rusted, making them difficult to remove. Apply penetrating oil and let it sit for a few minutes before trying again. For stubborn bolts, you might need to use pliers or a wrench to hold the nut while unscrewing from above.
After loosening the bolts, lift the old toilet seat off the bowl. It's that easy to replace! However, before installing the new seat, take this opportunity to:
- Clean the toilet bowl thoroughly
- Inspect the hinges for any damage
- Check if the new seat matches the bowl shape
If you encounter any issues during removal, don't force it. Excessive pressure can crack the porcelain. Instead, consider seeking help from a professional plumber to avoid damaging your toilet.
Clean the Toilet Bowl
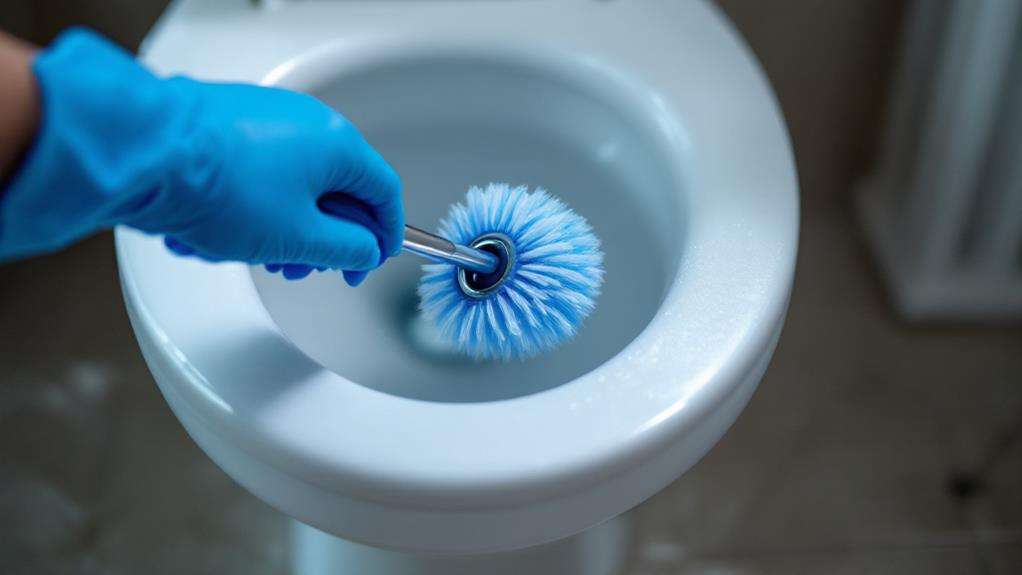
Now that you've removed the old seat, it's crucial to clean the toilet bowl thoroughly before installing the new one. This step ensures a hygienic surface for your new seat and makes the installation process smoother.
Start by putting on rubber gloves and gathering your cleaning supplies. Use a toilet brush and a disinfectant cleaner to scrub the entire bowl, paying special attention to the rim and the area where the seat attaches. Don't forget to clean under the rim, as this area often harbors bacteria and mineral buildup.
For stubborn stains, you might need to use a pumice stone or a specialized toilet cleaner. Make sure to rinse the bowl thoroughly after scrubbing to remove all cleaning residue. This will create a clean surface for your new seat and make it easier to clean in the future.
While cleaning, inspect the toilet for any damage or leaks. If you notice any issues, address them before installing the new seat. This is also an excellent opportunity to clean the rest of your standard toilet, including the tank and exterior surfaces. Once everything is spotless and dry, you're ready to replace your toilet seat with the new one.
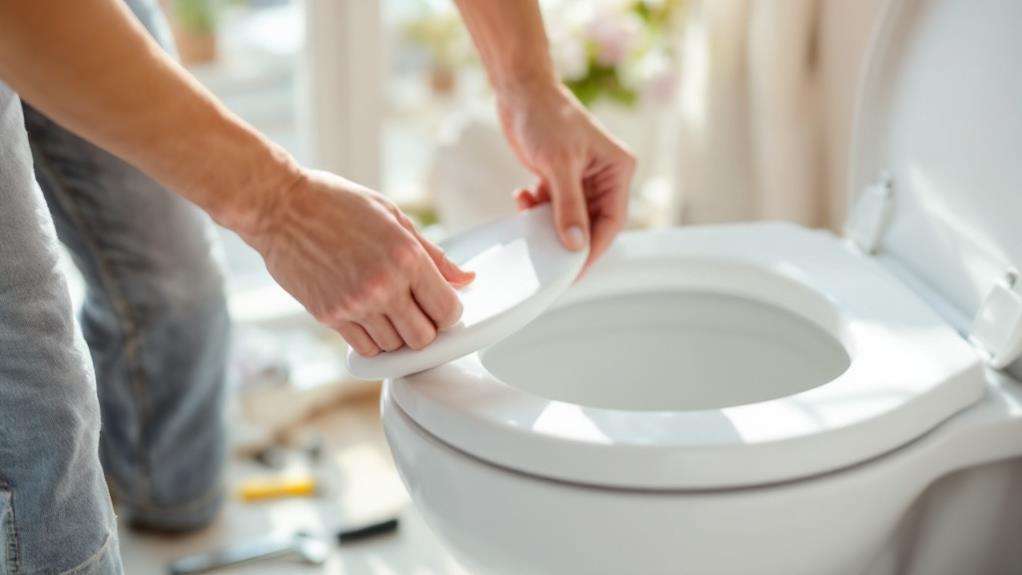
Install the New Seat
After thoroughly cleaning the toilet bowl, you're ready to install the new seat. Begin by positioning the new seat on the bowl, ensuring it aligns with the bolt holes. Whether you have an Elongated Toilet or a Round Toilet, the process remains similar. Insert the bolts from the underside of the toilet and secure them with nuts. Use an adjustable wrench to tighten the nut in place and bolt in place firmly.
Once secured, check that the new seat is level and properly aligned. Test its operation by lifting and lowering it several times. If you've opted for a Heated Seat or one with special features like quiet-close, make sure to test these functions as well.
Here are some additional tips to ensure a successful installation:
- Double-check the seat type matches your toilet (Elongated or Round)
- Avoid overtightening the bolts, which could crack the porcelain
- Consider using rubber washers for added stability
Test and Adjust
Three key steps ensure your newly installed toilet seat functions properly. First, test the new seat to confirm it fits correctly on the toilet bowl and operates smoothly. This is crucial whether you've chosen a compact elongated seat or one designed for elongated bowls.
Next, adjust the seat's positioning if necessary. If you notice any wobbling or looseness, tighten the bolts to secure the seat firmly. Ensure the seat is level and aligned correctly on the toilet. This step is particularly important for the Right Toilet experience, as proper alignment contributes to comfort and functionality.