
How to Install PVC Connectors for Leak-Free Plumbing
To install PVC connectors for leak-free plumbing, you'll need the right tools and materials, including a pipe cutter, primer, and cement. Start by measuring and cutting your pipes accurately. Clean and prepare all surfaces thoroughly before applying a thin layer of primer. Then, use PVC cement correctly, applying it to both the pipe and fitting. Assemble the connectors with a firm, steady pressure and a quarter-turn. Allow proper drying time, typically 24 to 48 hours, before pressurizing the system. Finally, conduct a leak test to guarantee watertight connections. By following these steps carefully, you'll be well on your way to a secure plumbing system.
Tools and Materials Needed
To install PVC connectors for leak-free plumbing, you'll need a few essential tools and materials. First, gather a hacksaw or PVC pipe cutter for precise cuts. You'll also need a tape measure, marker, and sandpaper to guarantee accurate measurements and smooth edges. Don't forget safety gear like gloves and goggles.
For the actual connection process, you'll need PVC primer and cement. These are pivotal for creating a strong, watertight bond. Make sure you've got the right pipe size selection for your project, as connectors come in various diameters. It is critical to check pipe material compatibility to ensure all components work together seamlessly.
Other necessary items include a clean cloth for wiping surfaces, and a level to confirm proper alignment. If you're working in tight spaces, consider getting a basin wrench or adjustable pliers. For more complex installations, you might need a drill and appropriate bits.
Lastly, have some spare PVC pipes and connectors on hand in case of mistakes or unexpected issues. With these tools and materials ready, you'll be well-equipped to tackle your PVC connector installation project efficiently and effectively.
Measuring and Cutting PVC Pipes
Precision is key when measuring and cutting PVC pipes for your plumbing project. Start by determining the exact lengths you need for each pipe section. Use a tape measure to take accurate pipe diameter measurements and mark the cutting points with a permanent marker. Double-check your measurements to avoid wasting materials.
When it comes to pipe cutting techniques, you have several options. For smaller diameter pipes, a PVC pipe cutter is the most efficient tool. Simply place the cutter around the pipe at your marked point, squeeze the handles, and rotate it around the pipe until it cuts through. For larger pipes, you'll need a hand saw or power saw. If using a hand saw, make sure to use one with fine teeth designed for plastic. For power saws, a miter saw or reciprocating saw works well. Whichever method you choose, always wear safety glasses and work gloves.
After cutting, use a deburring tool or sandpaper to smooth the cut edges. This step is indispensable for ensuring a proper fit and preventing leaks. Clean the pipe ends thoroughly before proceeding with the installation of connectors.
Cleaning and Preparing Surfaces
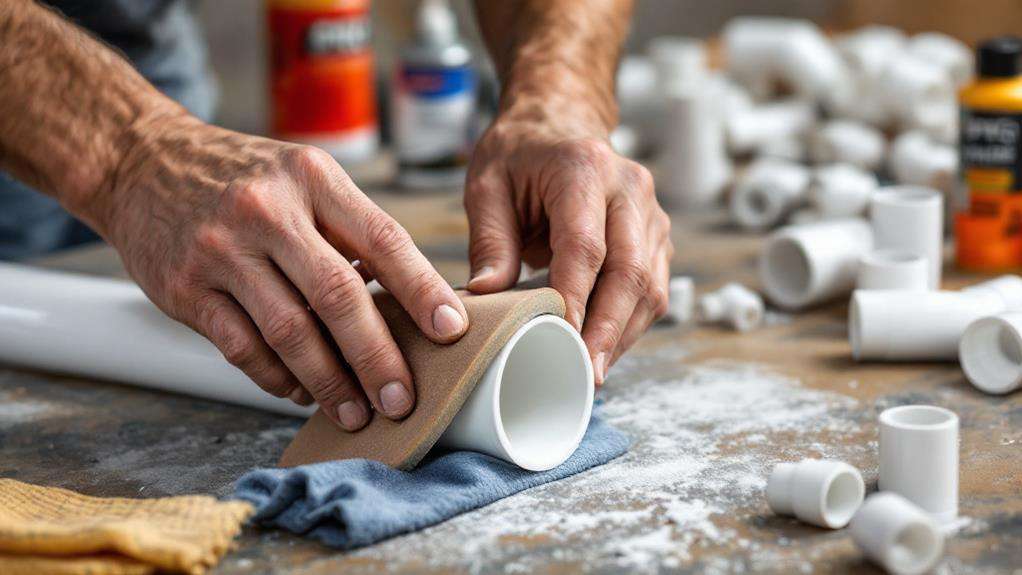
Cleanliness is paramount when preparing PVC pipes and fittings for installation. Before you begin the connection process, it's indispensable to remove any dirt, debris, or grease from both the pipe ends and the interior of the fittings. Start by wiping the surfaces with a clean, dry cloth to remove loose particles. For stubborn contaminants, use a specialized PVC cleaner or rubbing alcohol on a lint-free rag.
Ensuring surface smoothness is equally important. Inspect the cut ends of your pipes for any burrs or rough edges. If you find any, use fine-grit sandpaper to gently smooth them out. This step prevents potential leaks and ensures a tight seal. Don't forget to clean the sanded areas again after smoothing.
Next, check the fitting's interior for any manufacturing defects or debris. Use a small brush to clean inside if necessary. Once you've thoroughly cleaned and prepared all surfaces, avoid touching them with your bare hands. The oils from your skin can interfere with the bonding process. If you must handle the cleaned areas, use clean gloves. By carefully cleaning and preparing your PVC surfaces, you'll significantly increase the chances of achieving a leak-free, long-lasting plumbing connection.
Applying PVC Primer
Applying PVC primer is an essential step in creating a strong, leak-proof bond between PVC pipes and fittings. Before you begin, guarantee you're selecting the proper primer for your specific PVC materials. Most PVC primers are purple, making it easy to see where you've applied them.
To apply the primer effectively:
- Use a natural-bristle brush or applicator that comes with the primer
- Work quickly, as the primer dries rapidly
- Apply to both the pipe and fitting surfaces you'll be joining
Start by applying a thin, even coat of primer to the outside of the pipe end, covering an area slightly larger than the depth of the fitting. Then, apply primer to the inside of the fitting, ensuring complete priming of all surfaces that will come into contact. Be sure to cover the entire circumference of both pieces.
The primer will begin to soften the PVC surface, creating a chemical bond when the cement is applied. You'll notice the surfaces become slightly tacky – this is normal and indicates the primer is working. Once you've applied the primer, move quickly to the next step of applying PVC cement, as the primer's effectiveness diminishes rapidly after application.
Using PVC Cement Correctly
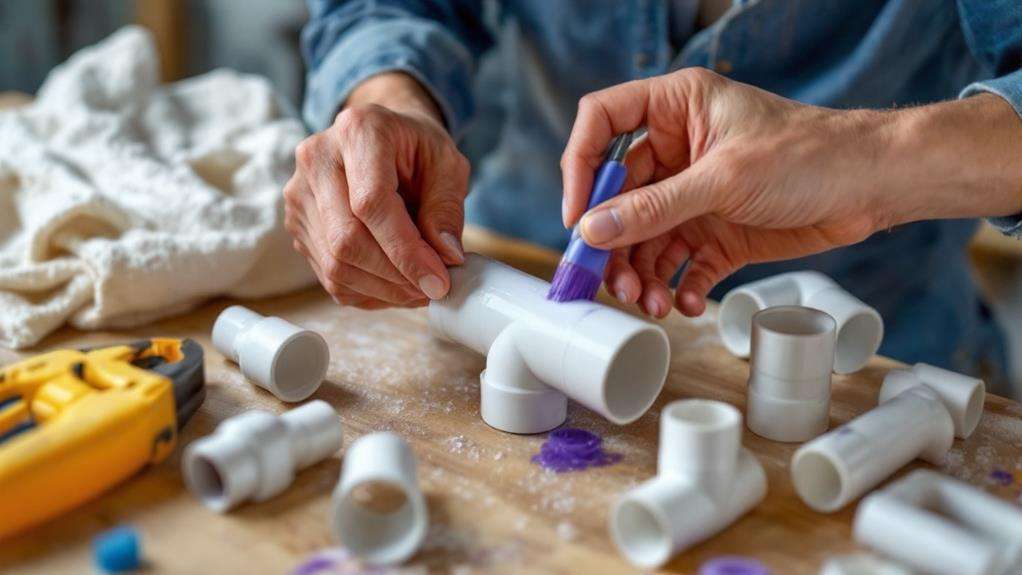
After priming, you'll need to apply PVC cement correctly to guarantee a strong, watertight bond. Proper application techniques are pivotal for ensuring leak-free connections. Start by selecting the right cement for your PVC type and size. Apply a generous, even coat of cement to the entire surface of the male fitting, then quickly apply a thinner layer to the inside of the female fitting.
Avoiding common mistakes is essential for successful PVC installation. Don't skimp on cement – use enough to cover the entire surface but avoid excess that could drip inside the pipe. Work quickly, as PVC cement sets fast. Insert the pipe into the fitting immediately after applying cement, giving it a quarter turn to distribute the adhesive evenly. Hold the joint in place for about 30 seconds to allow initial bonding.
Be cautious not to apply cement to the pipe's interior or the fitting's exterior, as this can create weak spots. Also, don't twist the pipe after it's fully seated, as this can break the initial bond. Allow the joint to cure according to the manufacturer's instructions before pressurizing the system. By following these steps, you'll create strong, reliable PVC connections.
Assembling PVC Connectors
With the cement applied correctly, you're ready to assemble your PVC connectors. The key to a successful assembly lies in quick and precise action. Once you've applied the cement, immediately insert the pipe into the fitting, making sure it's fully seated. Give the connection a quarter turn to evenly distribute the adhesive and create a strong bond.
When working with PVC pipe fittings, remember these essential steps:
- Align the pipe and fitting correctly before applying cement
- Push the pipe into the fitting with a firm, steady pressure
- Hold the connection in place for about 30 seconds to allow initial bonding
As you assemble your PVC connectors, be mindful of the different adhesive options available. While PVC cement is the most common choice, there are specialized adhesives for specific applications, such as those designed for use with flexible PVC or for high-pressure systems.
After assembly, allow the connections to cure fully before testing or using the plumbing system. Curing times can vary depending on temperature and humidity, but generally, you should wait at least two hours before applying any pressure. For ideal results, let the system cure for 24 hours before use.
Allowing Proper Drying Time

Proper drying time stands out as a critical step in PVC connector installation. After applying the PVC cement and assembling the joints, you must allow sufficient time for the adhesive to cure fully. This process typically takes 24 to 48 hours, depending on environmental conditions and the specific cement used.
To uphold optimal drying, maintain proper ventilation in the work area. Good airflow helps dissipate fumes and promotes faster curing. Additionally, keep a consistent temperature throughout the drying period, ideally between 60°F and 100°F. Extreme temperatures can affect the cement's performance and compromise the joint's integrity.
Avoid applying any pressure or stress to the newly joined pipes during the drying time. This means refraining from running water through the system or handling the pipes unnecessarily. If you're working on a vertical installation, use temporary supports to hold the pipes in place while they dry.
Remember that rushing this step can lead to weak joints and potential leaks. Always consult the cement manufacturer's instructions for specific drying times and recommendations. By allowing proper drying time, you'll establish a strong, leak-free plumbing system that will last for years to come.
Testing for Leaks
Once the PVC cement has fully cured, it's time to verify your installation's integrity. Start by visually inspecting all connections for any signs of misalignment or excess cement. Then, pressurize the system with water and carefully examine each joint for leaks. Be thorough in your inspection, as even small drips can lead to significant damage over time.
To guarantee a comprehensive test, follow these steps:
- Turn on the water supply and let it run through the pipes for several minutes
- Check for any immediate leaks or drips around the connections
- Leave the system pressurized for at least 24 hours, monitoring for slow leaks
During this extended testing period, regularly inspect the joints and surrounding areas for moisture. Use a dry cloth or paper towel to wipe around each connection, looking for any signs of wetness. Pay close attention to areas that are hard to see or reach, as these are often prone to overlooked leaks.
If you detect any leaks, mark the location and turn off the water supply immediately. You'll need to cut out the faulty connection and reinstall a new fitting. Remember, a properly installed PVC connection should remain watertight for years to come.