
DIY Guide: Installing a Sprinkler System in Your Yard
To install a DIY sprinkler system, start by planning your yard's layout and assessing water needs. Gather essential tools and materials, including pipes, fittings, and sprinkler heads. Dig trenches for the pipes, ensuring proper depth and spacing. Install the pipes and valves, connecting them to your water supply and backflow preventer. Attach sprinkler heads strategically for optimal coverage. Finally, set up a programmable timer to control watering schedules. While this project requires effort, it'll save you time and water in the long run. With the right preparation and know-how, you'll be on your way to a lush, effortlessly maintained lawn.
Key Takeaways
- Measure your yard, assess soil type, and plan sprinkler head placement for optimal coverage.
- Gather necessary tools and materials, including pipes, fittings, and a backflow preventer.
- Dig trenches 6-12 inches deep for pipes, using a power trencher for efficiency.
- Install pipes, valves, and connect sprinkler heads, ensuring proper spacing and water pressure.
- Set up a programmable timer to control watering schedules for different zones in your yard.
Planning Your Sprinkler System
Planning is the cornerstone of a successful DIY sprinkler system installation. To begin, measure your yard and create a detailed sketch, noting key features like your home, trees, and gardens. This map will serve as your blueprint for the entire project.
Next, assess your soil type and its water retention properties. This information will help you determine the irrigation needs of different areas in your yard. With this knowledge, map out the required water coverage and decide on sprinkler head placement. Remember to ensure overlapping sprays to prevent dry spots.
Measure your water pressure using a gauge, as this will impact the type of sprinkler heads and pipe sizes you'll need. Consider incorporating drip irrigation for flower beds and gardens to complement your main sprinkler system.
As you plan, think about the layout of your PVC pipes and where to place valves. This will help you determine the trenches you'll need to dig for your water lines. A well-thought-out plan will make the actual sprinkler system installation process smoother and more efficient, saving you time and potential headaches down the line.
Gathering Tools and Materials
Arming yourself with the right tools and materials is crucial for a successful DIY sprinkler system installation. Start by gathering essential items like shovels, pipes, fittings, sprinkler heads, timers, and a trenching machine. You'll need to determine the appropriate pipe diameter, thickness, and material based on local code requirements and climate conditions. For most residential installations, schedule 40 PVC pipe is a popular choice.
Don't forget to obtain a backflow preventer device if required by local regulations to protect your water source. To make the installation process easier, rent a power trencher to efficiently excavate trenches for your main line and water lines. This will save you time and physical effort compared to manual digging.
Ensure you have the proper PVC cement, primer, and pipe clamps to assemble your sprinkler system components correctly. You'll also need to consider your water pressure when selecting sprinkler heads and designing your system layout. Finally, gather valve boxes to protect and access your system's valves. With these tools and materials at hand, you'll be well-prepared to install a sprinkler system that keeps your yard lush and green.
Digging Trenches for Pipes
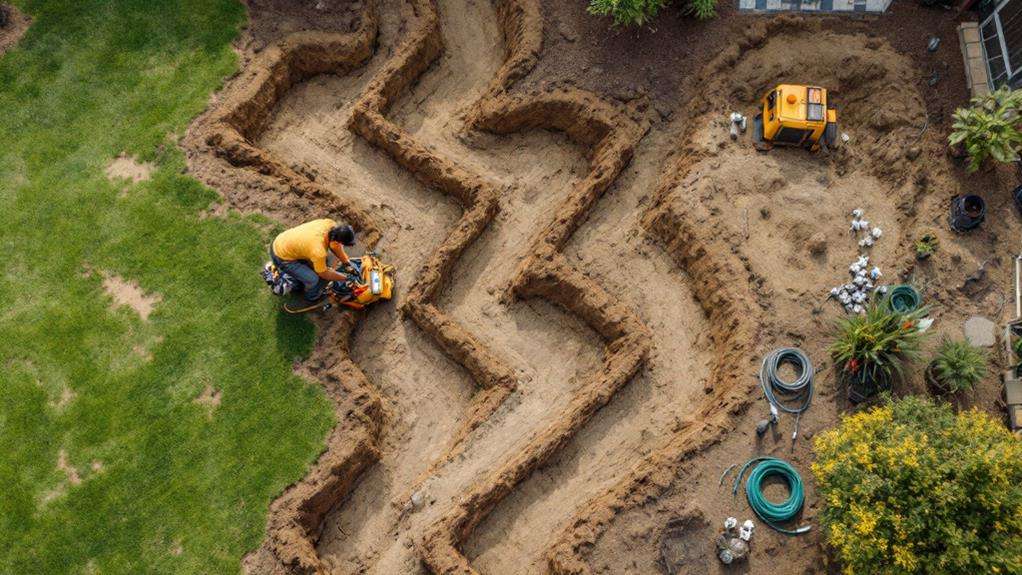
With your tools and materials ready, it's time to break ground. The key to a successful sprinkler system installation lies in properly digging trenches for your underground pipes. For efficient trench digging, use a power trencher or rent trenching equipment. This will help you create trenches 6 to 12 inches deep, following your marked layout.
If you're using polyethylene (Poly) pipe, you can bury it using a pipe pulling machine. This method is faster and creates less disruption to your yard. When installing valves on the manifold, ensure you leave enough space between them for easier installation and future maintenance.
For areas where you can't dig, such as under walkways, use water pressure to drill beneath the surface. This technique allows you to create a path for your pipes without damaging existing structures. Remember to maintain consistent depth throughout your trenches to ensure proper water flow and pressure in your sprinkler system. By following these guidelines, you'll create a solid foundation for your DIY sprinkler system, setting the stage for efficient irrigation and a healthier lawn.
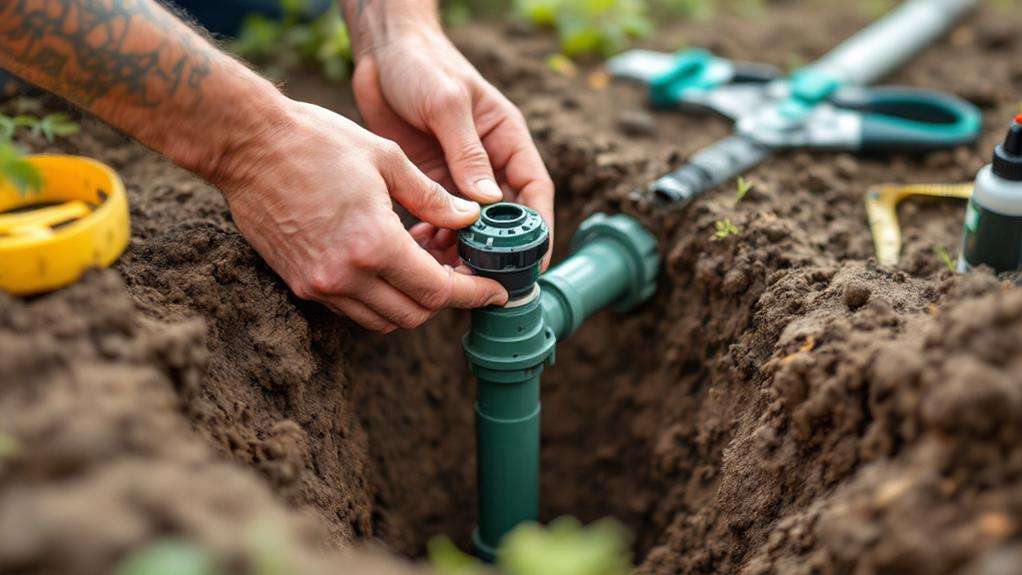
Installing Pipes and Valves
Pipes and valves form the backbone of your DIY sprinkler system. Once you've dug the trenches, it's time to install these crucial components. Start by connecting the water supply to your system, making sure to install a backflow preventer if required by local regulations. This device prevents contaminated water from flowing back into your home's water supply.
Next, assemble your PVC pipes using cement and primer, or connect polyethylene pipes with clamps. Lay out the pipes along the trench layout, using swing joints or flexible PEX pipe to make connections. Be careful to avoid any existing gas lines or other utilities.
Here's what you'll need for this stage:
- PVC cement and primer
- Pipe cutter
- Valve manifold
- Backflow preventer
- Pop-up sprinkler heads
Before attaching the sprinkler heads, manually flush the system to clear any dirt or debris from the pipes. This step ensures your lawn sprinkler system will function properly. Install the valve manifold, which will control the valves for different zones in your yard. Remember to leave enough slack in the pipes to account for temperature changes and ground settling. With the pipes and valves in place, you're one step closer to a lush, well-watered lawn.
Connecting Sprinkler Heads
Now that you've laid the groundwork, it's time to connect the sprinkler heads. This crucial step in your DIY irrigation project ensures efficient water distribution across your lawn. Start by attaching pop-up sprinkler heads to the flexible pipes, pushing the barbed fittings all the way in for a secure connection. Remove the caps from the sprinkler heads and install the appropriate spray nozzles, following the manufacturer's instructions.
To achieve optimal coverage, space the sprinkler heads strategically, ensuring overlapping spray patterns. Adjust the vertical pipe length to secure each head at the proper height. Consider using adjustable, head-to-head sprinkler heads like those from Rain Bird to target specific watering areas effectively.
Before you turn on the main water supply, attach the zone valves and double-check all connections. Using a pressure gauge, verify that the system is operating within the recommended range. As you turn on the water, observe each sprinkler head to ensure proper function and coverage. If you notice any issues, such as uneven spray patterns or leaks where the pipe connects to the sprinkler head, address them promptly to guarantee your DIY irrigation system performs optimally.
Setting Up Timer Controls
Setting up timer controls is a crucial step in automating your DIY sprinkler system. Install a programmable timer near your water meter and main water service to efficiently manage your irrigation system. Choose a Wi-Fi-enabled timer that allows you to control and monitor your watering schedule remotely via a smartphone app. Look for advanced features like rain delay, soil moisture sensors, and water flow monitoring to optimize water usage and maintain proper water pressure.
When selecting a location for your timer, ensure it's in a weather-protected area with access to both the water supply and an electrical source. Connect the timer wires to each zone valve, allowing you to control individual sections of your sprinkler system. This setup enables you to customize watering durations based on the specific needs of different areas in your yard.
Here's what you'll need for setting up your timer controls:
- Programmable timer with Wi-Fi capabilities
- Weatherproof enclosure for outdoor installation
- Electrical outlet or low-voltage transformer
- Wire strippers and connectors
- Screwdriver and mounting hardware
- Smartphone for remote access and control