
Best Practices for Soldering Copper Pipes
To solder copper pipes effectively, prioritize safety by working in a well-ventilated area and wearing protective gear. Use the right tools, including a pipe cutter, flux, and lead-free solder. Clean and prepare the pipes thoroughly, applying flux evenly. Heat the joint uniformly, watching for visual cues like bubbling flux. Apply solder correctly, letting capillary action draw it into the joint. Allow the joint to cool completely before cleaning and testing. Remember to practice on scrap pieces to refine your technique. By following these best practices, you'll be well on your way to becoming an expert in this essential plumbing skill. There's much more to learn about perfecting your soldering technique.
Safety Precautions
Safety is paramount when soldering copper pipes. Before you begin, guarantee you're working in a well-ventilated area to prevent inhaling harmful fumes. Open windows or use fans to improve air circulation. Wear safety goggles to protect your eyes from splattering solder and flux. Don't forget heat-resistant gloves to shield your hands from burns.
For fire prevention, keep a fire extinguisher nearby and clear the work area of flammable materials. Use a heat-resistant mat or metal sheet to protect surfaces from heat damage. Be cautious of nearby combustible materials, including wood framing or insulation.
When handling the soldering iron, always treat it as if it's hot. Use a proper stand to rest the iron between uses, and never leave it unattended while it's on. Keep the cord away from your work area to prevent accidental burns or tripping.
Lastly, be mindful of the solder and flux you're using. Choose lead-free solder to avoid exposure to toxic fumes, and use flux sparingly to minimize harmful vapors. Always wash your hands thoroughly after soldering to remove any residual chemicals or metals.
Essential Tools and Materials
A well-equipped toolbox is pivotal for successful copper pipe soldering. You'll need a reliable pipe cutter, which is indispensable for making clean, precise cuts. For most DIY projects, a compact, wheel-style pipe cutter is recommended. It's easy to use and provides consistent results. When it comes to copper pipe selection, choose the appropriate diameter and wall thickness for your specific application.
Other necessary tools include a propane torch, flux brush, emery cloth, and solder. Opt for lead-free solder that's specifically designed for plumbing applications. You'll also need a heat-resistant work surface, such as a fire brick or metal sheet, to protect surrounding areas while soldering.
Don't forget safety equipment: heat-resistant gloves, safety glasses, and a fire extinguisher should always be within reach. A wire brush is useful for cleaning pipe surfaces before applying flux. For larger projects, consider investing in a pipe reamer to smooth out the inside edges of cut pipes.
Lastly, keep a supply of fittings on hand, including couplings, elbows, and tees. Having these readily available will save you time and frustration during your soldering project.
Preparing the Copper Pipes

Before you begin soldering, proper preparation of the copper pipes is essential for guaranteeing a strong, leak-free joint. Start by inspecting the pipes for any damage or imperfections. If you find any, cut off the affected sections using a pipe cutter.
Next, focus on pipe surface cleaning. Use a wire brush or emery cloth to thoroughly clean the outer surface of the pipe and the inner surface of the fitting. This removes oxidation, dirt, and oils that can interfere with the solder's ability to adhere. Pay special attention to the areas where the pipe and fitting will connect.
After cleaning, it's time for pipe deburring. Use a deburring tool or reamer to remove any sharp edges or burrs from the cut ends of the pipe. This step is pivotal as it ensures a smooth, even flow of water and prevents turbulence that could lead to erosion over time.
Proper Flux Application
With the pipes properly cleaned and deburred, you're ready to apply flux. This step is essential for creating a strong, leak-free joint. Choose a flux specifically designed for copper pipe soldering, as it'll help remove any remaining oxides and promote better solder flow.
To achieve consistent flux coverage, use a flux brush or applicator. Dip it into the flux container and apply a thin, even layer to the outside of the pipe end and the inside of the fitting. Make sure you cover the entire surface that'll be in contact with the solder. Don't skimp on flux, but avoid over-applying it, as excess flux can cause issues during soldering.
For the perfect flux quantity, aim for a coating that's just thick enough to be visible. Too little flux won't adequately prepare the surfaces, while too much can lead to voids in the joint or cause the solder to run. If you accidentally apply too much flux, wipe off the excess with a clean cloth.
Heating Techniques
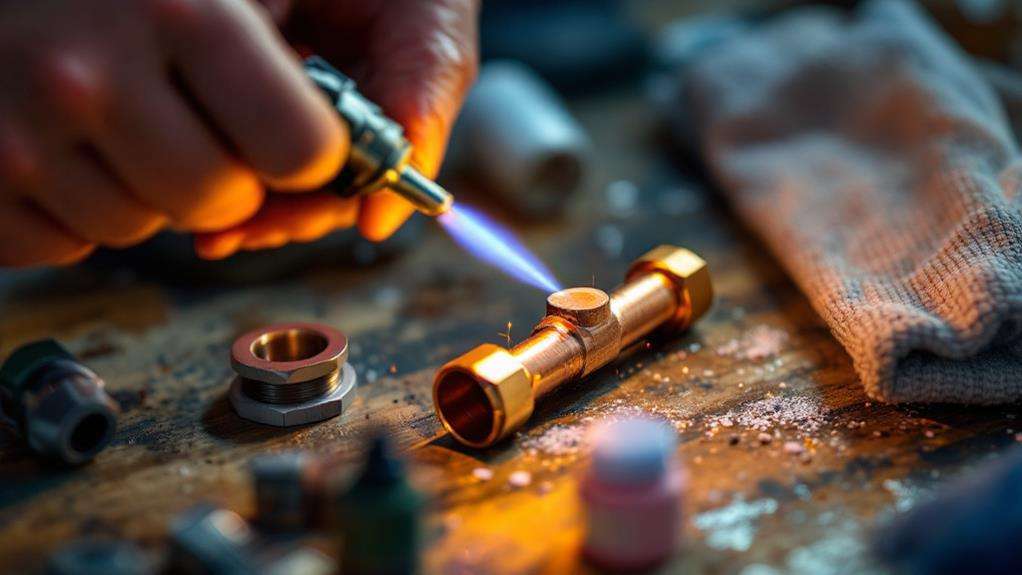
Proper heating is critical for creating a strong, leak-free solder joint. When soldering copper pipes, you'll need to use controlled heat sources and employ effective temperature monitoring techniques. Start by selecting an appropriate heat source, such as a propane torch or MAPP gas torch, depending on the pipe size and your working environment.
Begin heating the pipe fitting, not the pipe itself. Apply heat evenly around the fitting, moving the flame constantly to avoid overheating one area. As you heat the joint, watch for these visual cues:
- The flux begins to bubble and smoke
- The copper changes color, becoming slightly darker
- The solder melts when touched to the joint
- A thin, shiny ring of solder appears at the base of the fitting
Once you see these signs, remove the heat and quickly apply solder to the joint. The residual heat will draw the solder into the connection. Be cautious not to overheat the pipe, as this can cause the solder to burn and weaken the joint. With practice, you'll develop a feel for the right amount of heat and timing needed for perfect solder joints.
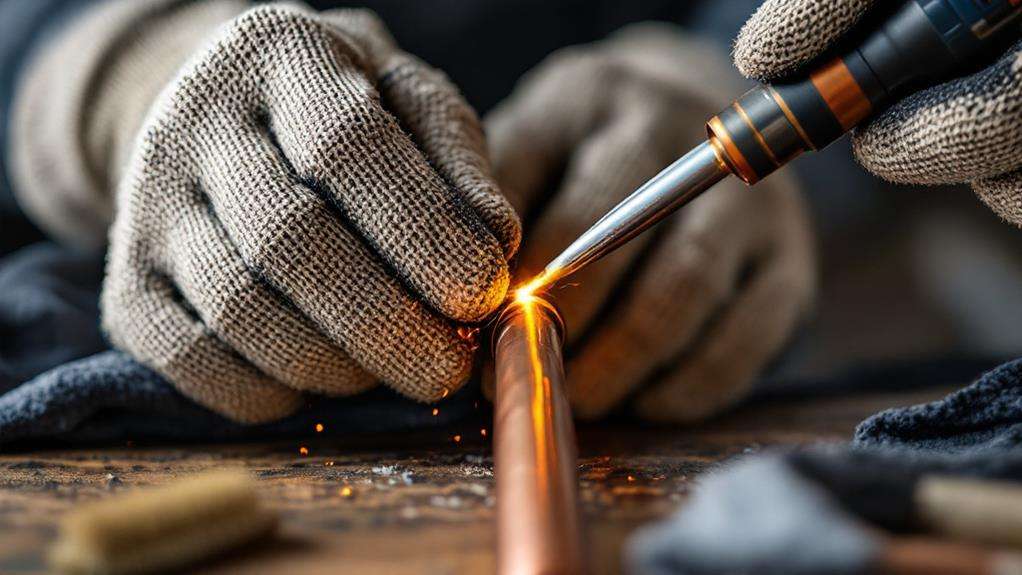
Applying Solder Correctly
Applying solder properly is crucial for creating a watertight seal in your copper pipe joints. To guarantee proper pipe alignment, hold the solder against the joint where the pipe and fitting meet. As you apply heat to the opposite side of the joint, you'll notice the solder begin to melt and flow into the gap. Don't push the solder in; let capillary action draw it into the joint naturally.
For an efficient soldering method, move the flame around the joint to distribute heat evenly. When the solder flows freely and completely around the joint, you've applied enough. Avoid using too much solder, as excess can cause blockages or weak spots. Once you've finished applying solder, keep the joint still for a few seconds to allow it to cool and solidify.
After soldering, inspect the joint carefully. A properly soldered connection should have a continuous, shiny ring of solder visible at the edge of the fitting. If you see gaps or dull areas, you may need to reheat and apply more solder. Remember, practice makes perfect when it comes to applying solder correctly.
Cooling and Cleaning
After soldering, you'll need to let the joint cool completely before handling or testing it. This cooling process is indispensable for proper pipe preparation and guarantees a strong, leak-free connection. While waiting, you can prepare for the final step: cleaning.
Once the joint has cooled, it's time to focus on effective cleaning methods.
- Use a damp cloth to wipe away any excess flux around the joint
- Remove any solder drips or spatter with fine-grit sandpaper
- Apply a mixture of water and baking soda to neutralize any remaining flux
- Rinse the area thoroughly with clean water
- Dry the pipe completely with a clean, lint-free cloth
Proper cleaning is essential to prevent corrosion and secure the longevity of your plumbing system. It also helps you inspect the joint for any imperfections or potential leaks. Remember, a well-cleaned joint not only looks professional but also performs better in the long run. By following these cooling and cleaning steps, you'll complete your soldering project with confidence and precision.
Troubleshooting Common Issues
Even experienced plumbers encounter challenges when soldering copper pipes. When you face issues, it's vital to approach troubleshooting systematically, identifying root causes and implementing effective solutions.
One common problem is leaks at joints. If you notice water seeping from a connection, it's likely due to incomplete solder coverage or improper heating. To fix this, you'll need to disassemble the joint, clean it thoroughly, and resolder. Make sure you apply enough heat and solder to create a watertight seal.
Another issue is solder that doesn't flow properly. This can result from insufficient cleaning, inadequate flux application, or incorrect temperature. Double-check your preparation steps and ensure you're heating the pipe evenly.
Sometimes, you might encounter difficulty in mitigating leaks caused by pinhole defects in the pipe. In these cases, you'll need to cut out the damaged section and replace it with a new piece of pipe.
If you're consistently experiencing problems, consider factors like pipe cleanliness, flux quality, and your soldering technique. Practice on scrap pieces to refine your skills and troubleshoot without the pressure of a live plumbing project.