
Why Is My Water Heater Leaking? Troubleshooting Tips
If your water heater is leaking, the first step is to inspect the tank for signs of damage or sediment buildup. Check the connections and fittings for any leaks, and examine the pressure relief valve for proper operation. Corrosion and rust can also cause issues, so consider replacing the anode rod. Tightening loose fittings and adjusting water pressure can help resolve the problem, but if the tank is severely damaged, you may need to replace the entire unit. Proper maintenance and regular inspections can help prevent future leaks and extend the life of your water heater.
Key Takeaways
- Inspect the water heater tank for sediment buildup, cracks, or holes, and contact a professional plumber if significant damage is found.
- Check the water heater connections, including fittings, water supply hoses, and the temperature and pressure relief valve, to ensure they are not leaking.
- Examine the pressure relief valve for signs of leakage, pressure buildup, and proper operation, and replace it if malfunctioning.
- Address any corrosion or rust by examining the anode rod condition, flushing the tank, and considering water heater replacement if the issues are extensive.
- Resolve loose or damaged fittings by tightening them, replacing washers, and applying plumber's tape to create a secure connection.
Inspecting the Water Heater Tank
When troubleshooting a leaking water heater, the first step is to inspect the tank. Start by checking for sediment buildup at the bottom of the tank. Over time, minerals and debris can accumulate, which can cause the tank to crack and leak. Use a flashlight to peek through the drain valve and see if there's a significant amount of sediment.
Next, inspect the tank's insulation. If the insulation is damaged or missing, it can lead to condensation buildup, which may drip and appear as a leak. Run your hands along the tank's surface to check for any bare spots or areas where the insulation is deteriorating. If the insulation is in poor condition, you may need to replace it.
Additionally, examine the tank for any visible cracks or holes. Even a small crack can cause water to seep out. If you notice any signs of damage, it's best to contact a professional plumber to assess the issue and determine if the tank needs to be replaced.
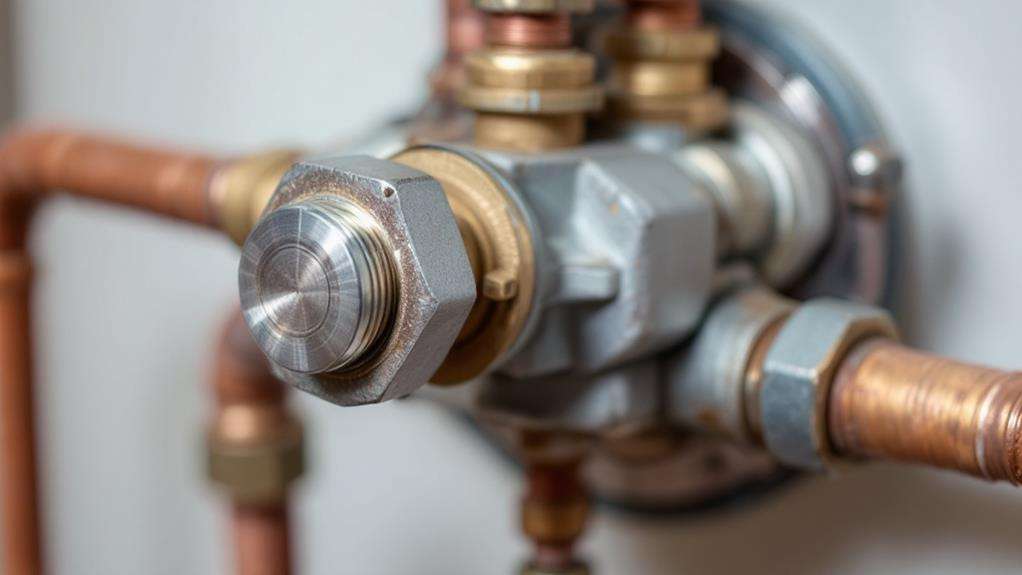
Checking the Water Heater Connections
Next, check the water heater's connections. Reviewing the installation process and inspecting the hose connections can help you identify the source of the leak. Start by examining the water supply lines and drain pipes connected to the water heater.
Here's what to look for:
- Check the fittings: Ensure that all the fittings are tight and not leaking. Tighten any loose connections with a wrench.
- Inspect the hoses: Look for any cracks, holes, or signs of wear in the water supply hoses. Replace them if necessary.
- Examine the drain valve: Make sure the drain valve is closed properly and not dripping.
- Inspect the temperature and pressure relief valve: Confirm that this valve is not leaking and that the discharge pipe is directing water to a safe location.
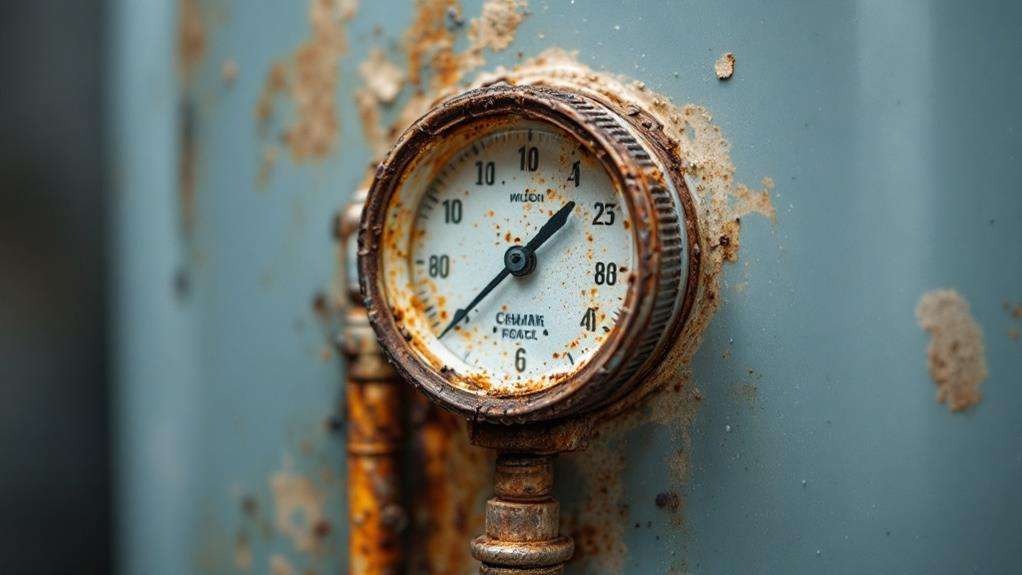
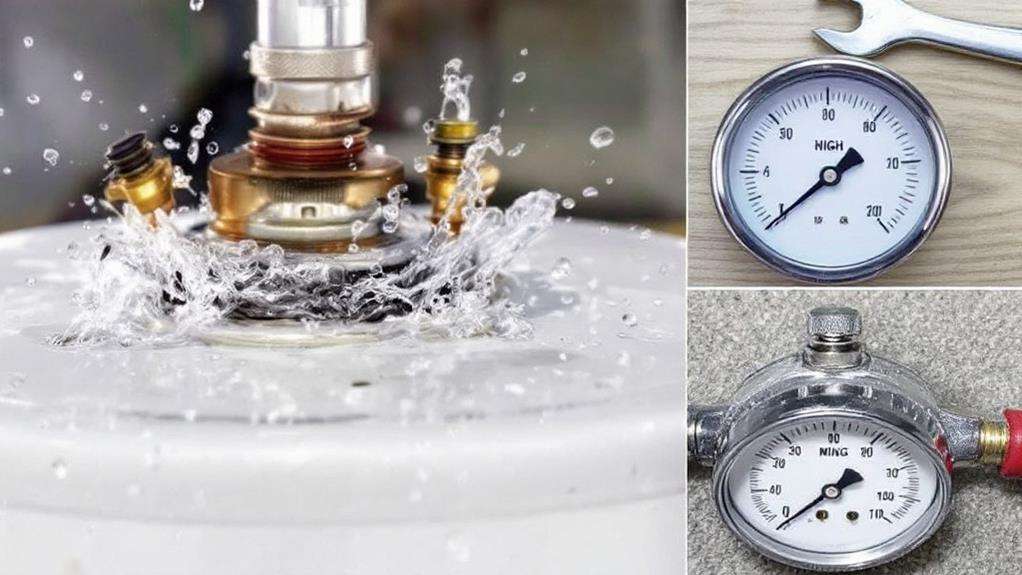
Examining the Pressure Relief Valve
The pressure relief valve is a critical component of your water heater that requires close attention. This valve is designed to release excess pressure, preventing your water heater from potentially bursting. Start by examining the pressure relief valve for any signs of leakage. If water is dripping from the valve, it could indicate that the internal pressure is too high.
Next, check the pressure gauge on your water heater. This will help you identify if there's any pressure buildup. If the gauge shows the pressure is above the recommended range, the pressure relief valve may need to be replaced. In some cases, adjusting the temperature setting on your water heater can help regulate the pressure and prevent leaks.
If the pressure relief valve is malfunctioning, it's essential to address the issue promptly. Ignoring a leaking or stuck valve can lead to more severe problems, such as a water heater explosion. Don't hesitate to call a professional if you're unsure how to properly examine and maintain the pressure relief valve.
Assessing the Temperature and Pressure Relief Valve
In addition to the pressure relief valve, you'll also want to examine the temperature and pressure relief valve (T&P valve) on your water heater. This critical component is designed to release excess pressure and prevent the tank from rupturing.
When evaluating the valve's condition, look for the following:
- Mineral buildup or corrosion, which can impede the valve's operation.
- Cracks or damage that could cause leaks.
- Proper operation by manually lifting the valve's lever to ensure it opens and closes smoothly.
- Any water dripping from the valve, which could indicate an underlying issue.
If you notice any problems with the T&P valve, it's essential to address them promptly. Monitoring pressure fluctuations is also crucial, as sudden spikes could cause the valve to open unexpectedly and lead to leaks. By staying vigilant and taking proactive measures, you can help prevent water heater leaks and maintain a safe, efficient system.
Investigating Corrosion and Rust
Alongside the temperature and pressure relief valve, closely inspecting your water heater for signs of corrosion and rust is crucial. Corrosion can cause leaks, leading to water damage and potential safety hazards. Start by examining the anode rod condition. This sacrificial metal rod helps prevent the tank from corroding, but it can wear down over time. If the anode rod is severely depleted, it may be time to replace it.
Additionally, look for signs of sediment buildup, which can accelerate corrosion. Sediment can insulate the water, causing the heating elements to work harder and potentially fail prematurely. To address this, try flushing the tank to remove any accumulated deposits. If the corrosion or rust is extensive, you may need to consider replacing the entire water heater to prevent further issues and ensure your home's safety.
Resolving Loose or Damaged Fittings
Apart from the anode rod and sediment buildup, loose or damaged fittings can also contribute to water heater leaks. If you notice dripping around the inlet or outlet connections, it's likely due to fittings that have come loose or seals that have deteriorated over time.
To resolve this issue, you'll need to tighten the fittings or replace any damaged washers. Here's a step-by-step guide:
- Turn off the water supply and power to the water heater.
- Use a wrench to tighten the inlet and outlet fittings, being careful not to overtighten.
- Inspect the washers and replace them if they're cracked or worn.
- Apply a small amount of plumber's tape to the threads before reassembling the fittings to create a tighter seal.
Addressing Excessive Water Pressure
If your water heater is leaking due to excessive water pressure, it's important to address this issue promptly. One potential solution is adjusting the pressure regulator, which controls the incoming water pressure to your home. This can often be found near the main water shut-off valve. Use a wrench to carefully turn the regulator clockwise to decrease the pressure. Monitor the pressure and adjust the regulator until the reading falls within the recommended range, typically between 40-80 PSI.
Additionally, be mindful of your overall water usage. Excessive usage, such as running multiple high-flow appliances simultaneously, can contribute to increased pressure in the system. Try to stagger your water usage and avoid simultaneous high-demand activities. If the leaking persists even after adjusting the pressure regulator, you may need to consider a more comprehensive plumbing inspection to identify any other underlying issues.
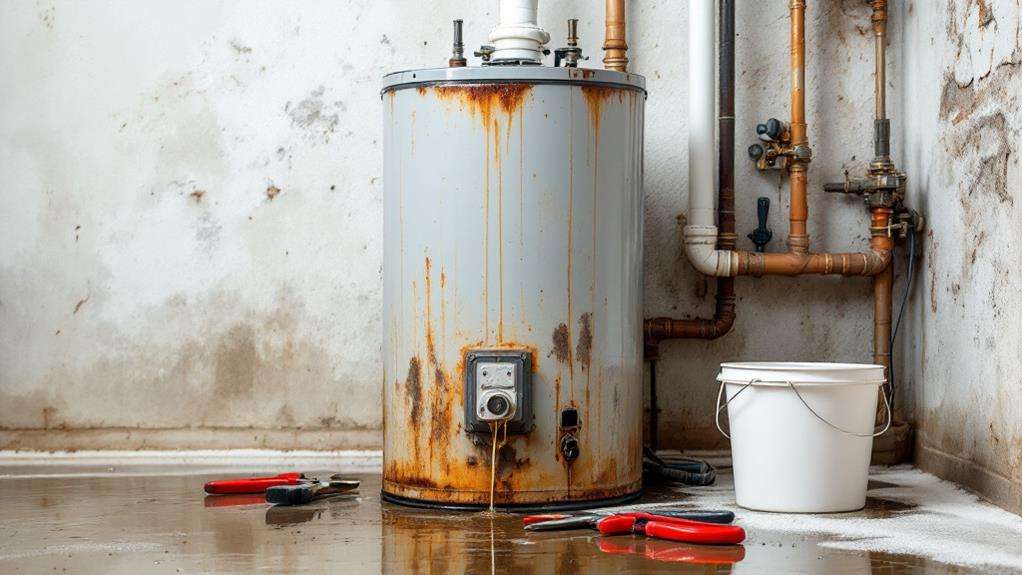
Replacing the Water Heater Tank
If the water heater tank itself is the source of the leak, it may be time to consider replacing the entire unit. Tank replacement costs can vary, but it's generally a worthwhile investment to ensure your home has a reliable hot water supply. The tank replacement process typically involves:
- Shutting off the power or fuel source to the water heater.
- Turning off the water supply and draining the tank.
- Disconnecting the old tank and installing the new one.
- Reconnecting the power or fuel source and restoring the water supply.
Once the new tank is in place, you'll need to check for any additional leaks and ensure the system is functioning properly. Remember to budget for the cost of the new tank, as well as any labor fees associated with the replacement. With a little preparation and the right tools, you can get your water heater back up and running smoothly.
Preventing Future Water Heater Leaks
Preventing future water heater leaks requires proactive maintenance and attention to potential problem areas. Maintaining proper insulation around your water heater is crucial to prevent condensation buildup, which can lead to leaks. Ensure the tank is well-insulated, and consider adding an insulation jacket if needed.
Scheduling regular maintenance is another key step to preventing leaks. Have a professional inspect your water heater annually, checking for signs of corrosion, sediment buildup, and any other issues that could compromise the integrity of the tank. They can also test the pressure relief valve to ensure it's functioning correctly.
Additionally, be mindful of the age of your water heater. Most have a lifespan of 8-12 years, so consider replacing it if it's nearing the end of its useful life. Proactively addressing potential problems can save you from the hassle and expense of dealing with a leaking water heater down the line.