
How to Winterize Your Outdoor Plumbing to Prevent Freezing
To winterize your outdoor plumbing, start by disconnecting and storing all hoses. Next, shut off the interior water supply to outdoor faucets and drain them completely. Install insulation covers over exposed faucets for extra protection. Don't forget to winterize your sprinkler system by shutting off its water supply and blowing out any remaining water. Perform these tasks before temperatures drop below 35°F (1.7°C) to prevent freezing and costly damage. Use proper tools like wrenches, pliers, and faucet covers for effective winterization. By taking these steps, you'll safeguard your plumbing from winter's harsh effects. Explore further to ensure you've covered all bases in protecting your outdoor water systems.
Key Takeaways
- Disconnect and store all hoses, then drain outdoor faucets completely by shutting off interior valves and opening spigots.
- Install insulation covers on outdoor faucets to provide an extra layer of protection against freezing temperatures.
- Winterize your sprinkler system by shutting off the water supply and blowing out remaining water from pipes.
- Apply heat tape, foam insulation, or pipe wrap to exposed pipes to prevent freezing in vulnerable areas.
- Complete winterization before temperatures drop below 35°F (1.7°C) to prevent last-minute emergencies and costly repairs.
Understanding Frozen Pipe Risks
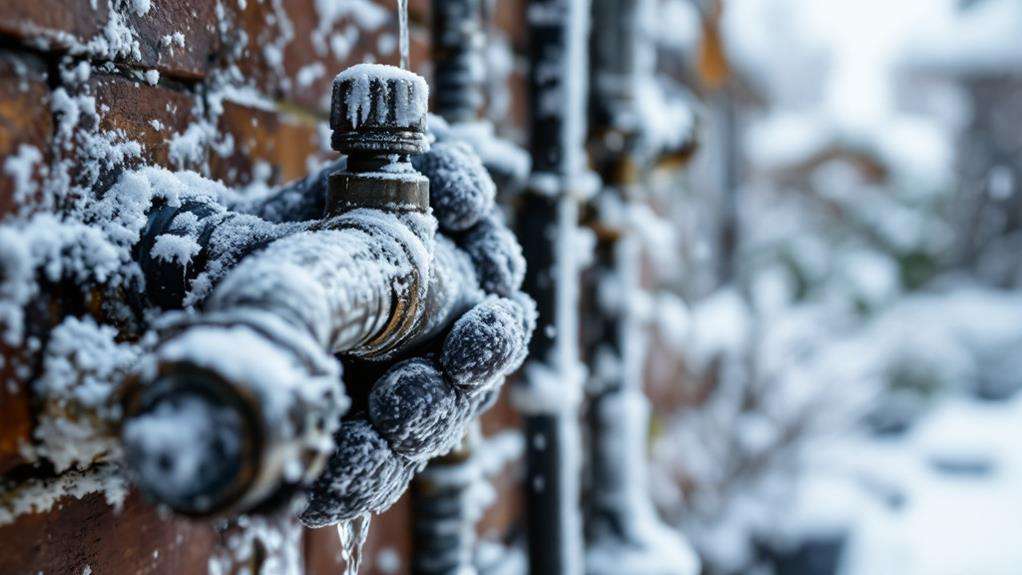
Imagine waking up to a flooded basement or yard due to a burst pipe. This nightmare scenario is all too common when homeowners fail to winterize their outdoor plumbing. As temperatures drop, the water inside your pipes can freeze, expanding and creating immense pressure that can crack or burst the pipes. The result? Costly water damage and repairs that could have been easily prevented.
Outdoor faucets and exposed pipes are particularly vulnerable to freezing temperatures. When water freezes in these areas, it can lead to significant plumbing failures. You'll want to protect these crucial points to prevent water damage and expensive repairs. Keep an eye out for visible frost or ice accumulation on faucets or pipes, as this is a clear sign that freezing weather is affecting your plumbing.
To safeguard your home, it's essential to take preventive measures. Start by shutting off the water supply valve to outdoor faucets and draining any remaining water from the pipes. Insulate exposed pipes and consider installing frost-free hose bibs. By taking these steps to winterize your outdoor plumbing, you'll significantly reduce the risk of frozen pipes and the associated water damage.
When to Winterize Outdoor Faucets
The key to successful outdoor plumbing winterization lies in timing. You'll want to winterize your outdoor faucets after you've finished using them for the season, typically in the fall. It's crucial to complete this task before temperatures are forecast to drop below 35°F (1.7°C), as this is when freezing becomes a risk.
Don't wait until the last minute to winterize your outdoor water sources. Plan to tackle this job over a weekend or after work, ensuring you have enough time to properly shut off the interior valves, drain the pipes, and protect your faucets from freezing. By winterizing before cold weather arrives, you'll prevent pipes from bursting and avoid costly repairs.
Tools and Materials Needed
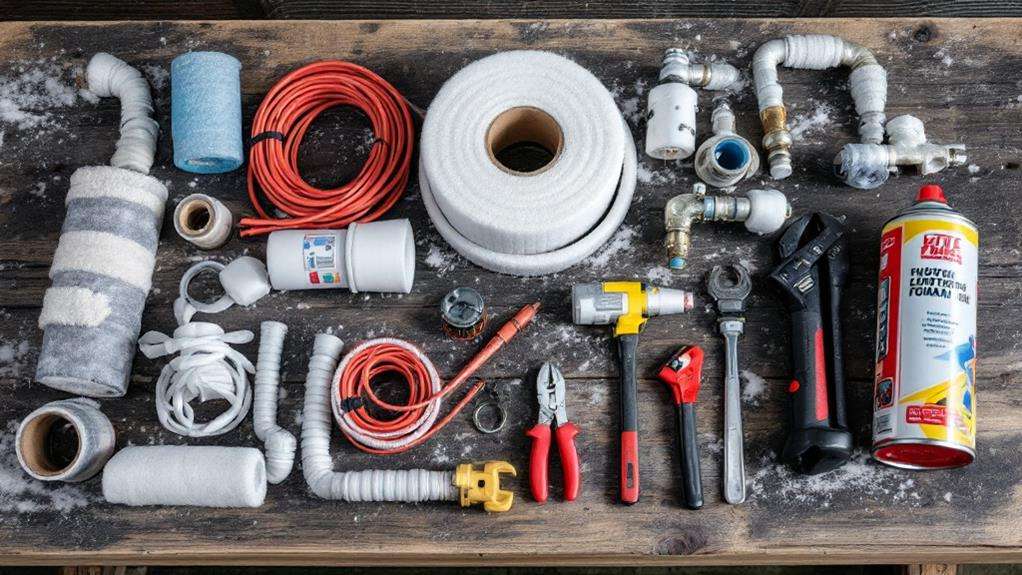
Now that you know when to winterize, let's focus on gathering the right tools and materials for the job. To properly winterize your outdoor faucets and plumbing, you'll need a few essential items. Start with the basics: a wrench, pliers, and a bucket. These will help you disconnect hoses, tighten fittings, and catch any residual water.
Don't forget to grab outdoor faucet covers or insulation to protect your spigots from freezing temperatures. You'll also need a screwdriver and a garden hose for draining purposes. To shut off the water supply, you may require a water shutoff valve key or tool, so keep one handy.
For more comprehensive winterization, consider additional materials like heat tape, foam insulation, and pipe wrap. These can provide extra protection for exposed pipes and prevent water from freezing inside them.
Safety should be your top priority when working with plumbing, especially in enclosed spaces. Always wear work gloves and use a flashlight to navigate dark areas. By having all these tools and materials ready, you'll be able to efficiently winterize your outdoor faucets and plumbing, ensuring they're protected throughout the cold season.
Disconnecting and Storing Hoses
One of the most crucial steps in winterizing your outdoor plumbing is disconnecting and storing your hoses properly. To prevent outdoor faucets from freezing, you'll need to remove all hoses, splitters, and other fittings from your spigots. This step is essential even for freeze-proof spigots, as it eliminates the risk of water remaining in the system and causing damage.
Don't wait until the last minute to tackle this task. Complete it before winter sets in to ensure you've removed all potential sources of trapped water. By taking this pre-emptive action, you'll prevent freezing and protect your spigots from costly damage.
Once you've disconnected your hoses, it's important to store them correctly. Coil them properly and place them horizontally on a flat surface, away from direct sunlight and snow. Before storage, inspect your hoses for any pinholes and repair them to ensure they survive the winter intact. This careful storage method will help maintain water flow and prevent exposed pipes from succumbing to cold temperatures.
Draining Faucets and Pipes
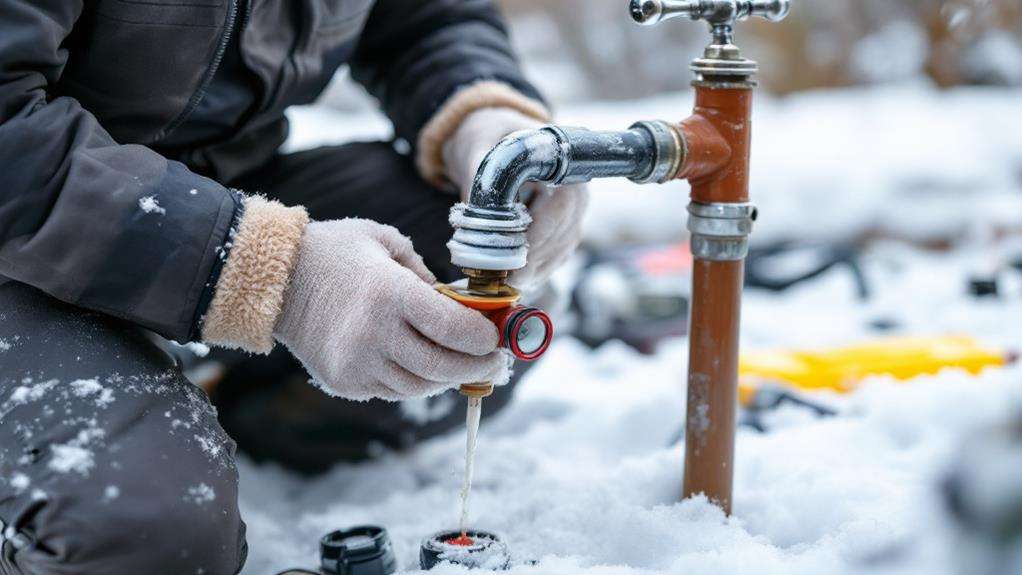
Draining your outdoor faucets and pipes thoroughly is crucial to prevent freezing and potential damage during winter. To winterize your outdoor plumbing effectively, start by locating the interior shut-off valve that controls the water supply to your outdoor spigots. Turn this valve off completely to stop water flow to the exterior faucets.
Once you've shut off the water supply, it's time to drain any remaining water from the pipes. Open all the outdoor spigots and let the water run until it stops completely. This process may take a few hours, so be patient. It's essential to leave the spigots open during this time to ensure all water has drained from the pipe section leading outdoors.
Don't forget that even frost-free spigots need this treatment. Any trapped water in these fixtures can still freeze and cause damage. By turning off the water and allowing the pipes to drain fully, you're eliminating the risk of water freezing and expanding within the plumbing system.
Winterizing outdoor faucets and pipes is a critical step in preparing your home for cold weather. This process helps prevent costly repairs and ensures your outdoor plumbing system remains intact throughout the winter months.
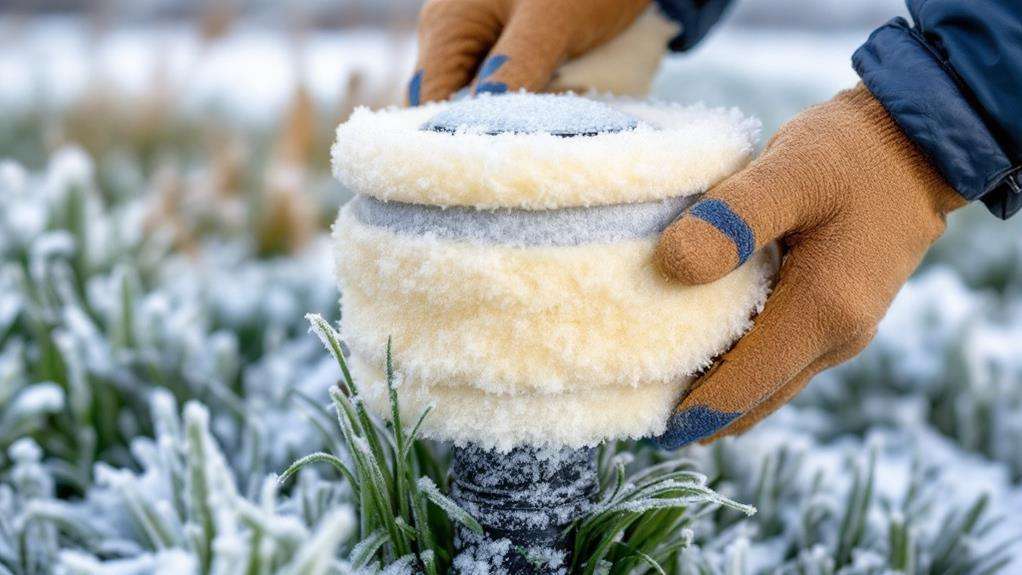
Installing Insulation Covers
After draining your outdoor faucets and pipes, it's essential to install insulation covers for added protection against freezing temperatures. These covers provide a crucial layer of protection for your outdoor plumbing, even if you have freeze-proof faucets. Don't overlook this step, as it's the final piece in ensuring your outdoor water system survives harsh winters.
You'll find several options for insulation covers, including dome-shaped and square-shaped designs made from materials like foam or fabric. Choose a high-quality, durable cover that fits snugly over your faucet to trap heat and prevent ice formation. This extra insulation is particularly important for faucets located outside and open to the elements.
When installing the cover, make sure it's securely in place and covers the entire faucet. This will help ensure your outdoor plumbing remains functional throughout the winter. Remember, even if you've already taken steps to protect your water heater and allow water to drain from pipes, these covers provide an additional safeguard against freezing temperatures. By investing in proper insulation, you'll have peace of mind knowing your outdoor plumbing is well-protected during the coldest months.
Protecting Sprinkler Systems
Now that you've secured your outdoor faucets, it's time to turn your attention to your sprinkler system. Protecting your sprinkler system is crucial to prevent costly freeze damage and ensure it'll be in the best service come spring.
To winterize your sprinkler system, start by shutting off the water supply to the outdoor pipes. This step is essential to minimize the risk of water freezing and expanding within the pipes. Next, blow out any remaining water in the system to prevent cracks or bursts when temperatures drop.
Don't forget to cover exposed pipes and components to shield them from harsh winter conditions. This simple step can save you from dealing with leaky outdoor plumbing when the weather warms up.
Make sure to set a date and time for winterizing your sprinkler system before the first freeze. It's just as important as protecting your outdoor faucets and can save you significant repair costs. By properly draining and preparing your system, you'll avoid the headache of fixing damaged pipes leading to your sprinklers when spring arrives. Remember, when water freezes, it expands, potentially causing severe damage to your entire outdoor plumbing system.
Addressing Leaks Before Winter
Before you wrap up your outdoor plumbing winterization, it's crucial to address any existing leaks. Inspect all outdoor faucets and spigots for signs of drips or leaks. Even minor drips can lead to major issues during freezing weather, potentially causing your water line to freeze and burst. It's a good idea to replace any faulty washers, cartridges, or other parts in your faucets before the cold winters set in.
Don't underestimate the importance of this step – unattended leaks can result in costly and damaging consequences. When water freezes and expands, it can cause pipes to burst, leading to extensive water damage in your home's water system. To prevent this, turn the water off to outdoor fixtures and ensure they're properly sealed before insulating and covering them for winter.
If you're unsure about how to address leaks or want a professional assessment, don't hesitate to call us. We can help identify and fix any potential issues, ensuring your outdoor plumbing is fully prepared to withstand the freezing temperatures. Remember, addressing leaks now can save you from significant headaches and expenses later, so take the time to stop water-related problems before they start.
Professional Winterization Services
While addressing leaks is a key step in winterization, some homeowners prefer to leave the entire process to professionals. Professional winterization services offer a comprehensive approach to protecting your outdoor plumbing from severe cold. These experts can identify potential issues in your crawl space and recommend the best winterization methods for your specific needs.
Licensed plumbers have the experience to properly drain and insulate your pipes, ensuring there's no water left inside the pipes that could freeze and cause costly repairs. They'll also install insulated covers for outdoor faucets and check that hoses are disconnected from the faucet. In colder climates, professional winterization services are especially valuable, as they can implement advanced techniques to protect your plumbing system from extreme temperatures.