
French Drain Installation: A Step-by-Step Guide

To install a French drain, start by evaluating your property's drainage needs and planning the drain's location. Gather necessary tools and materials, then dig a sloped trench away from your home's foundation. Line the trench with fabric and add an initial layer of gravel. Place the perforated pipe on top, wrap it with fabric, and backfill with more gravel and soil. Grade the area to maintain proper slope, and consider landscaping options to blend the drain with your yard. Regular maintenance, including debris removal and inspections, will keep your French drain functioning effectively. By following these steps, you'll be well on your way to a drier, healthier property.
Understanding French Drains
French drains get to the root of drainage problems by redirecting water away from your property. They consist of a perforated pipe surrounded by gravel, which collects and channels excess water. You'll find these systems particularly effective in areas with poor soil drainage or where water tends to accumulate.
The advantages of French drains are numerous. They prevent water damage to your home's foundation, reduce soil erosion, and mitigate basement flooding. You'll also notice improved lawn health as they eliminate soggy areas. French drains work silently underground, maintaining your scenery's aesthetics while solving moisture issues.
However, there are some disadvantages of French drains to ponder. Installation can be labor-intensive and may disrupt your existing scenery. You'll need to perform regular maintenance to prevent clogging, which can reduce effectiveness over time. In areas with high water tables or clay soil, French drains might not be as productive.
Before installing a French drain, assess your property's specific needs. Evaluate factors like soil type, slope, and local rainfall patterns. You may need to combine French drains with other drainage solutions for ideal results in challenging situations.
Assessing Your Drainage Needs
Before diving into a French drain installation, you'll need to thoroughly examine your property's drainage needs. Start by identifying problem areas where water tends to pool or where soil remains consistently damp. Walk your property during or after heavy rainfall to observe water flow patterns and locate low spots where drainage issues occur.
Next, evaluate site conditions that affect drainage. Ponder factors such as soil type, property slope, and existing landscaping features. Clay soil retains more water and may require a more extensive drainage system, while sandy soil drains more readily. Inspect the overall grade of your land to determine if water naturally flows away from your home and structures.
Take note of any underground utilities, tree roots, or other obstacles that could interfere with drain installation. You'll also want to deliberate where the water will be directed once it enters the French drain system. Ensure you have a suitable outlet point that won't create issues for neighboring properties or violate local regulations. By carefully examining your drainage needs, you'll be better equipped to design an effective French drain system customized to your property's specific requirements.
Planning Your French Drain
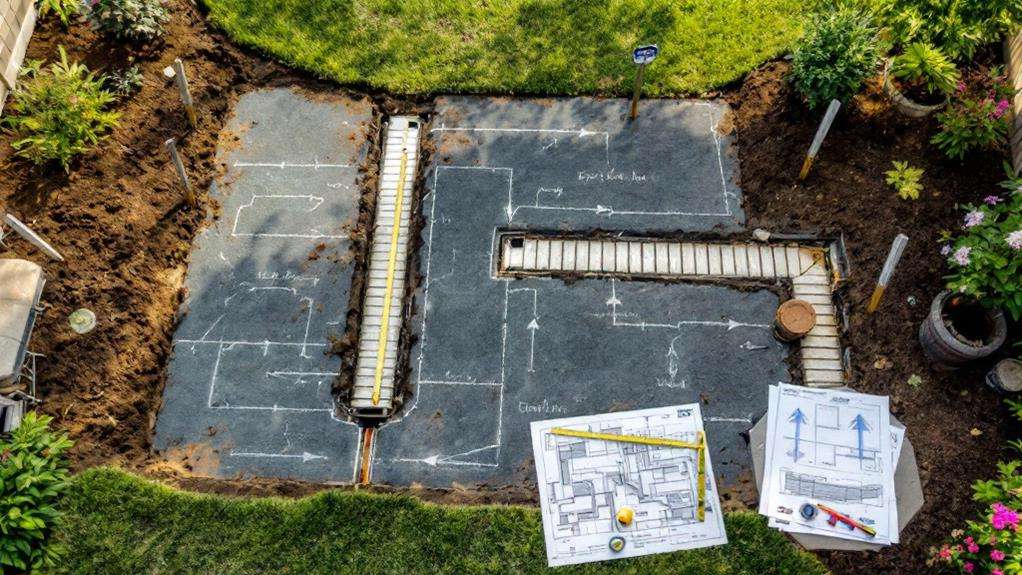
A well-conceived plan is crucial for a successful French drain installation. After evaluating your drainage needs, it's time to map out your project. Begin by carefully considering the site selection. You'll want to choose a location that allows water to flow away from your home's foundation and any other vulnerable structures.
Next, examine your property's soil composition. This will help you determine the drain's depth and the type of gravel you'll need. Clay soils may require a deeper trench, while sandy soils might allow for a shallower installation.
When planning your French drain, keep these key factors in mind:
- Slope: Guarantee a minimum 1% grade for proper water flow
- Length: Calculate the distance needed to divert water effectively
- Width: Consider the volume of water you're dealing with
- Outlet: Plan where the water will ultimately discharge
Don't forget to check local building codes and obtain any necessary permits before starting your project. It's also wise to contact utility companies to mark underground lines. By taking the time to plan thoroughly, you'll set yourself up for a smooth and effective French drain installation process.
Gathering Tools and Materials
With your plan in place, it's time to assemble everything you'll need for your French drain installation. Start by evaluating site conditions to determine the specific materials required. You'll need perforated pipe, terrain fabric, gravel, and a catch basin or outlet pipe. Consider purchasing materials in bulk to save money, especially if you're tackling a larger project.
Essential tools include a shovel, rake, level, tape measure, and wheelbarrow. You might also need a trencher or excavator for larger jobs. Don't forget safety gear like gloves, goggles, and sturdy boots. If you're connecting to an existing drainage system, you may need additional fittings or adapters.
When purchasing materials, opt for high-quality options that will withstand the test of time. Choose gravel that's the right size for your project, typically 3/4 to 1 1/2 inches in diameter. Guarantee you have enough terrain fabric to line the entire trench and wrap around the pipe. It's always better to have a little extra than to run short mid-project. By gathering all your tools and materials beforehand, you'll avoid delays and establish a smooth installation process.
Digging the Trench
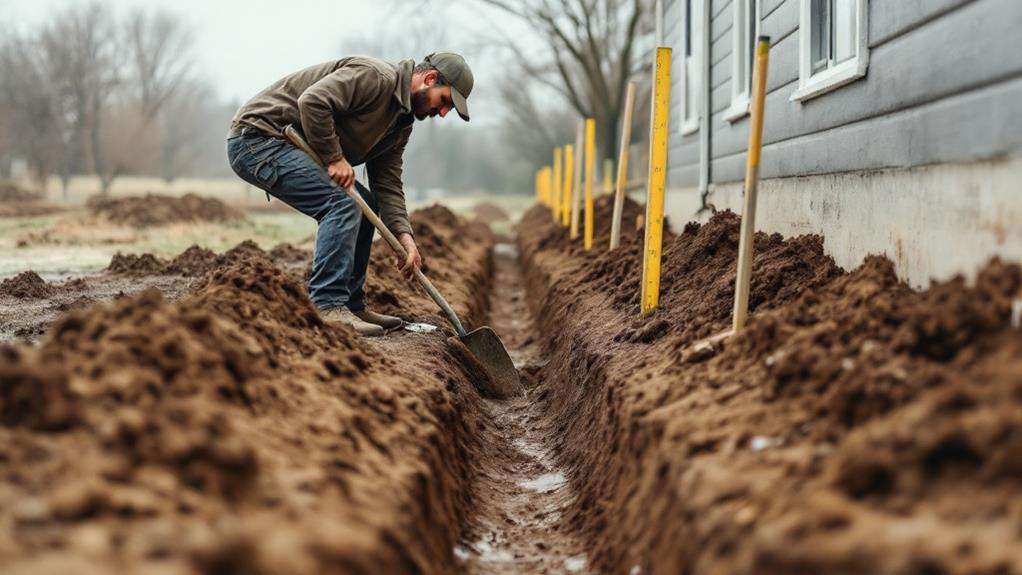
Digging the trench is conceivably the most labor-intensive part of French drain installation. Before you start, it's essential to contemplate the soil composition and trench dimensions. These factors will substantially impact your digging process and the overall efficacy of your French drain.
Begin by marking the trench's path using spray paint or stakes. Guarantee it slopes away from your house at a rate of about 1 inch per 8 feet. Then, start digging. The trench should typically be 18 inches deep and 9-12 inches wide, but adjust based on your specific needs and local building codes.
As you dig, keep these tips in mind:
- Remove grass and topsoil first, setting them aside for later use
- Check for underground utilities before digging deeper
- Use a level periodically to maintain the proper slope
- Smooth the trench bottom to prevent water pooling
If you encounter rocky soil or tree roots, you may need to adjust your trench dimensions or use specialized tools. Remember, the goal is to create a smooth, sloped channel for water to flow through. Take your time and ensure the trench is properly prepared before moving on to the next step of your French drain installation.
Installing the Drainage Pipe
In accordance with the trench preparation, installing the drainage pipe is the next vital step in your French drain project. Begin by selecting the appropriate pipe size, typically 4 inches in diameter for most residential applications. Guarantee the pipe has perforations or holes to allow water to enter.
Start laying the pipe at the highest point of your drainage area, maintaining a consistent slope of about 1 inch per 10 feet towards the outlet. As you place the pipe, check the pipe depth to guarantee it's at least 8 inches below the surface. Use a level to verify the proper gradient throughout the installation.
Connect pipe sections using couplings or fittings, ensuring a secure fit to prevent leaks or separations. Wrap the pipe with a permeable land fabric to prevent soil and debris from clogging the perforations. Secure the fabric with tape or zip ties every few feet.
At turns or corners, use elbow fittings to maintain a smooth water flow. Once you've laid the entire pipe, double-check its positioning and slope before proceeding to the next step of adding gravel and backfilling the trench.
Adding Gravel and Fabric
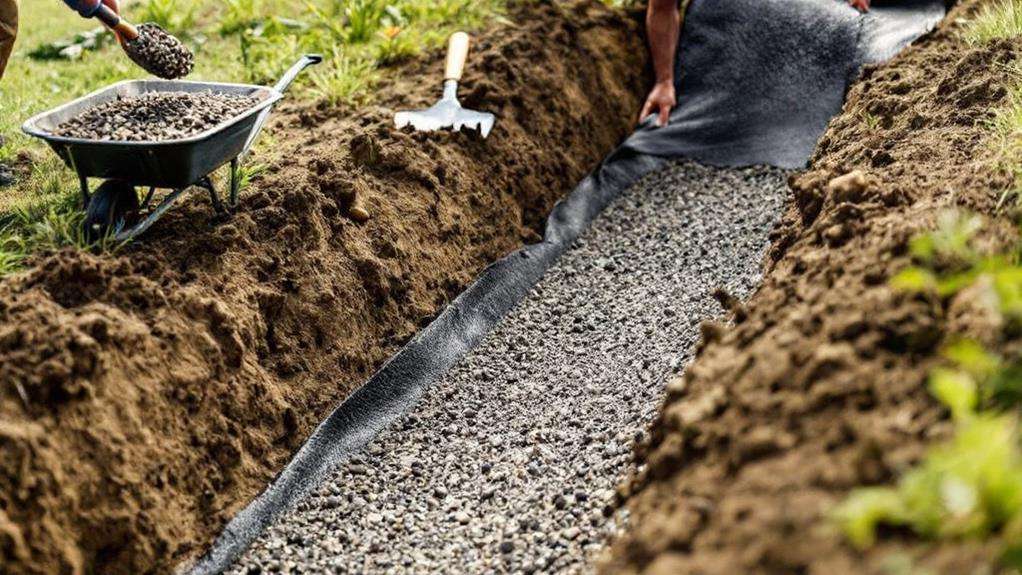
The next essential step in your French drain installation involves adding gravel and fabric. Selecting appropriate gravel size is vital for optimum drainage. You'll want to use clean, washed gravel ranging from 3/4 inch to 1 1/2 inches in diameter. Begin by adding a 2-3 inch layer of gravel at the bottom of your trench.
Next, focus on ensuring proper fabric installation. Lay terrain fabric over the initial gravel layer, allowing it to extend up the sides of the trench. This fabric acts as a barrier, preventing soil from clogging the drain. Place your perforated pipe on top of the fabric-covered gravel, then wrap the excess fabric over the pipe.
Continue filling the trench with gravel, leaving about 4 inches of space from the top. As you work, make sure to:
- Maintain a consistent slope for proper water flow
- Compact the gravel gently to eliminate air pockets
- Keep the fabric taut to prevent sagging
- Check for any tears or gaps in the fabric
Backfilling and Grading
With the gravel and fabric in place, you're ready to move on to backfilling and grading. Start by filling the trench with soil, leaving about 3-4 inches of space from the top. Use a hand tamper or plate compactor to compact the backfill in layers, ensuring stability and preventing future settling.
As you backfill, pay attention to sloping the trench away from your home's foundation. Maintain a gradual slope of about 1 inch per 8 feet to encourage proper water flow. Use a level to check the slope periodically as you work.
Once you've filled the trench, it's time to grade the surrounding area. Spread topsoil over the filled trench and blend it with the existing terrain. Create a slight crown over the drain to promote surface runoff. Use a rake to smooth out the area and remove any debris.
Landscaping Over the Drain
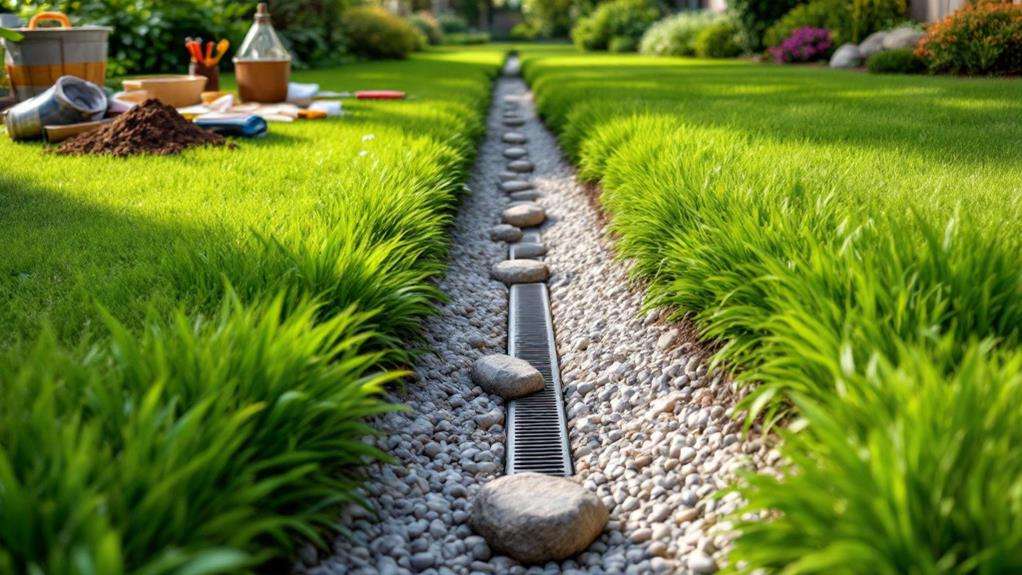
Now that your French drain is installed and backfilled, you'll want to examine planting options. Planting vegetation and incorporating landscaping features can help conceal the drain while enhancing your yard's aesthetics. When selecting plants, choose species with shallow root systems to prevent interference with the drain's function.
Consider these options for landscaping over your French drain:
- Ground covers: Low-growing plants like creeping thyme or sedum
- Ornamental grasses: Varieties such as fescue or sedge
- Shrubs: Compact evergreens or deciduous shrubs
- Decorative elements: River rocks, mulch, or stepping stones
When incorporating landscaping features, make sure they don't impede water flow to the drain. You can create a dry creek bed using river rocks or install a permeable pathway above the drain. If you're planting vegetation, use a layer of landscape fabric between the drain and soil to prevent roots from penetrating the system.
Remember to maintain a slight slope away from your home's foundation when landscaping. This will help direct surface water towards the French drain, facilitating proper drainage. By carefully selecting plants and features, you can create an attractive landscape that complements your yard while maintaining the functionality of your French drain system.
Maintenance and Troubleshooting
How can you guarantee your French drain continues to function effectively? Regular seasonal maintenance is key to ensuring your drainage system operates at peak performance. Inspect your drain at least twice a year, ideally in spring and fall. Clear away any debris, leaves, or sediment that may have accumulated around the drain's surface or in the gravel bed. Check for signs of erosion or soil displacement near the drain, and replenish gravel as needed.
Be vigilant for unexpected clogs, which can compromise your drain's efficiency. If you notice standing water or soggy areas in your yard, it's time to investigate. Use a plumber's snake or high-pressure water jet to clear any blockages within the perforated pipe. In severe cases, you may need to excavate a section of the drain to address the issue.
To prevent future problems, consider installing a catch basin or sediment trap at the drain's entrance. This will capture larger debris before it enters the system. Additionally, maintain proper landscaping practices, avoiding over-mulching or allowing grass clippings to accumulate near the drain. By following these maintenance tips, you'll keep your French drain functioning smoothly for years to come.